He brought me some prepared kombucha tea along with the culture and some photocopied pages. He said he had researched the topic and gotten the library in St. Charles to order factual, trustworthy books, and that he now had several people in the village taking the tea daily. He went over the process of preparing the tea and the benefits of consuming it, and wished me the best of luck, leaving me with a phone number and a reasonable amount of apprehension.


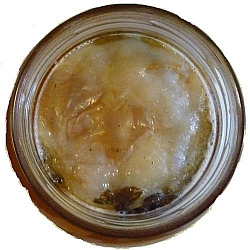
Peering at the kombucha culture bobbing in a sour-smelling fizzy liquid, a fungus with long strings dangling beneath it, I thought I knew from where some witch lore might have come (winky face).
Still, I had always wanted to try some type of detox, and here was a free and natural method readily available. Scanning the first page again, some keywords registered.
I remembered my uncle saying kombucha helps restore the natural flora in intestines, and saw that arthritis, grey hair (I don’t have any yet, but why not take preventative measures?), stress, insomnia, eyesight, headaches, skin and respiratory problems and so many more benefits were listed.
Now I really didn’t want to hurt the kombucha culture…
- A standard recipe calls for bringing 3 litres of water to a boil, adding 1 cup of sugar, and returning to a boil, only to immediately remove from heat and add 5 teabags.
- Once the tea is cooled to room temperature, transfer it to a 1-gallon glass jar and gently place the kombucha culture on top. If it sinks, don’t worry. It will float to the top as it becomes used to its new environment.
- Follow the culture with 1 cup of starter (the liquid in which the kombucha is stored when not fermenting) or a quarter cup of vinegar.
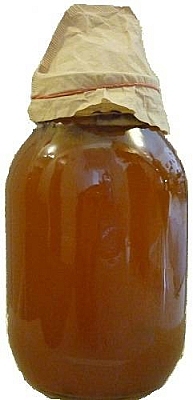
- Put a coffee filter over the jar, hold it in place with a rubber band, and forget about it a few days.
There are lots of ways to vary the recipe to come up with different flavours. Some sources say that the kombucha culture prefers white sugar best, though most agree it will thrive on any type of sugar. When I first started making kombucha tea, I used brown sugar because that’s what was in the cupboard. While the taste was better because a bit sweeter, the tea’s effects were perhaps a bit weaker.
Likewise, 5 teabags can be substituted for 5 tablespoons of loose tea. The tea then needs to be strained at any point before transferring it to the glass jar. The longer it soaks, the stronger the flavour will be. Any type of tea can be used, though sources again say the culture prefers black or green tea.
Some different methods also affect levels of carbonation and acidity. The standard recipe calls for fermenting the tea for four to ten days. The longer the culture ferments the tea, the more it will become acidic, first turning into vinegar, then alcohol. As it stands, kombucha tea contains a minor amount of alcohol — an amount equivalent to what can legally be sold in grocery stores — and for this reason, it actually helps alcoholics control their cravings.
Update: Read about why that’s actually inaccurate in Kombucha Revisited: Correcting Misconceptions (Including My Own)
Update: Read about why I increased the length of the fermentation cycle in Kombucha Tea 201: Tips and Tools.
The first few times you make kombucha tea, you’ll want to taste it to make sure it’s ready before removing the culture. It should taste something like apple cider or bubbly wine, although not quite so pleasant. Once ready, take out 1 cup of tea and put it in the jar with the starter liquid, where you will keep the kombucha culture while you prepare your next batch.
The culture feeds off the fermentation process, so it won’t get tired out from too much activity. If need be, refrigerate the kombucha culture in starter for up to six months.
Update: Learn why I was wrong about storing SCOBYs in the fridge by reading Kombucha Revisited: Correcting Misconceptions.
Update: Interested in brewing your own? Get Kombucha Mamma's free DIY Guide from Kombucha Kamp!
After about five months, I’m at 1 cup per day, and now I’ve got friends and family in French River hooked, too. Kombucha tea is great for people who don’t eat breakfast because it contains nutrients, boosts the metabolism, and provides energy. It’s been an easy sell so far.
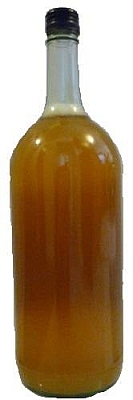
Not needing as much kombucha tea as I can produce, I’ve been selling some in small quantities to local residents. Bottles are priced at five dollars for 750 millilitres and ten dollars for one and a half litres — contact me if you’re in the area and would like to try some. Quantities are limited for now, but I’ll happily soon have a kombucha baby to put on the assembly line. At that time I may also consider participating in the Land of the Voyageurs Farmers’ Market in French River.
Update: You can now buy commercially-brewed kombucha tea from Eat Local Sudbury.
Cheers to a good start to every morning!
Very informative. Thanks.